If you have not reviewed my other blogs on re-inventing the Salesforce CRM connector, I encourage you to give them a read before you jump deep in to this one. It will give an idea as to why we landed at this very solution to achieve our goals and satisfy the requirements. Below are the links to the blog posts for reference –
Now, let us continue where we left off. I really wanted Tenant Service to work since it is a win-win for us. Firstly, we do not have to store all form submission information on Sitecore Contact card. We should strive to keep only useful and personalizable information on xConnect Contact card to keep xDB clean. Secondly, it would be a scalable solution. Let’s say if a new form is added to the website and the information entered need to make it to Salesforce on submission, it does not dev involvement. All it would need is a new Tenant pipeline and bunch of new value accessors for form and Salesforce. Isn’t this much more elegant than extending a custom update contact action every single time a new form is added? An absolute Yes!
Let us see how we made it happen. Do note that the set up is tedious, but, also note that this is one time thing. Once the set up is complete, all you would need is do maintenance by dropping/deploying latest binaries if you have some custom code in action. Alright here we go –
Installation and Setup
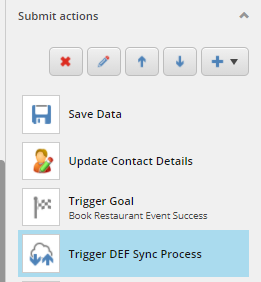
There is some good starter documentation out there that will get you started with Tenant Service, DEF and form submit action to fire the tenant service pipeline. Give that a read here.
Our case is more complicated than that, we need to fire a pipeline that would take that form context and submit that information to Salesforce instead, so, it would need bunch of other steps. Below is what was needed on our Sitecore Managed Cloud environment to give you an idea.
- A new web app created on Azure environment – Configuration depends on your needs and traffic. On our end, we decided it was a smart idea to match configuration of new web app to other web app’s on the environment such as CM/CD for instance. Once web app is ready, manually deploy the files. You can follow Manual deployment instructions noted on ‘Installation guide for Data Exchange Tenant Web Service’ document here. Another important thing to note here is to add ‘WEBSITE_LOAD_USER_PROFILE’ in Application Settings on web app created and set the value to ‘1’. If you do not do this you will get errors on Tenant Service that suggest data protection was unsuccessful.
- Also drop Tenant Service plugin for CRM Connector on Tenant service root location. Install package for ‘Salesforce CRM Plugin for Tenant Service’ from here and extract files and drop them in your tenant service root folder. Note, it is also required to drop Salesforce.Common and Salesforce.Force dll’s on to your Tenant Service root folder. With out this, you will see some errors when Tenant pipeline runs.
- Configure your connection string properly on Tenant Service web application to ensure it can talk to CM server properly.
- Ensure DEF and Salesforce CRM Connector both are installed and configured on CM server and CD server of the environment. The instructions should already be documented in corresponding downloads section for Data Exchange Framework and CRM Connector. Also, enable CM to talk to Tenant Service web application created in above steps. It is done via changing Sitecore.Services.Client.config setting ‘Sitecore.Services.SecurityPolicy’ to ‘Sitecore.Services.Infrastructure.Web.Http.Security.ServicesOnPolicy,Sitecore.Services.Infrastructure’.
- Finally for tenant service communication and SF activation ensure you have connection strings added to both CM and CD servers. Note down the connection string name for tenant service. Publish all core Sitecore nodes and restart all web app’s that have been touched on steps above.
- Ensure Tenant Service and CM can communicate well by going to {TenantservicewebappURL}/api/Tenant – If all is well, you should see all tenant service end points under main DEF tenant and if they are enabled
- Lastly ensure your form submit actions fires appropriate Tenant Service pipeline which internally has a step to submit the same to Salesforce. Use your connection string name copied on setting in the action. Your pipeline would look something similar to the screenshot below. Most of the pipeline steps are re-used/borrowed from out of the box CRM connector pipeline. All I had to do was to ensure queue settings and objects loaded are correct. Plus create all value accessors and mapping sets needed to ensure I map form data to correct object definition on Salesforce. All of this steps are already noted in my previous blog here


Note: As of this writing and the version of Tenant Service used, there was a bug that was preventing me to select certain field types on Form Value Accessors. I had to edit this item on Sitecore to include the field types that were missing – /sitecore/system/Settings/Validation Rules/Field Rules/Data Exchange Framework/Forms/Required Valid Form Field
If all goes well, you should now see form submission data on Salesforce as intended object. You might not get everything right on first go, so, to debug what is cooking you can go to Tenant Service root folder and check logs up there. You may have to check CD logs as well sometimes if Tenant Service logs are not showing anything useful.
All in all, Tenant Service is a great way to push information to third parties and scalability with zero code needed to do everything I just talked about is just super amazing. It will leave your Marketing team happy for sure. Only issue I found in this is performance impact due to all the processing happening on Form Submission, so, if you or your team is concerned about adding additional overhead/time to process form submissions, then, I recommend looking in to storing the information else where or on Contact. Form Submit Action responsible for triggering Tenant Service currently waits for the processing to complete before continuing with next form submit action step and redirecting the user to thank you page.
There are ways to convert some of this pipeline steps to be asynchronous by making custom processors using Tasks per Sitecore support, but, I have not tried it just yet. May be a post for later when I can get to that.

